 Image: Vladimir Krisetskiy
Creating a Character
Follow this guide carefully to begin character creation and the audit process. Your audit will be quicker if you spend the time following directions.
NOTE, this website is the only source of where you should be looking up your content. We have everything right here for you in one convenient place! Even spell lists!
Some content has been adjusted for our server's unique homebrew. It may not match current books or content from WoTC or other providers.
Our homebrew has been developed and adjusted over the past 4+ years for the unique aspects of how the server runs and the stories that are told. While you might not see how this works at first glance, it has been well-balanced for our style of play. You can still have unique, fun, and powerful characters, often even more so than in source material with our buffs to the PHB!
1.0 Basic Info & Sources
Read below for a quick overview of what is allowed. You will start actually creating your character in Step 2.0
1.1 Ability Scores
We use the 27 point buy system. You can find a very handy calculator here: Point Buy Calculator. You won't need this quite yet, as you will first create your character in Chronica before moving to Roll20, we're just letting you know.
We use the 27 point buy system. You can find a very handy calculator here: Point Buy Calculator. You won't need this quite yet, as you will first create your character in Chronica before moving to Roll20, we're just letting you know.
1.2 Starting Level
You will begin your adventures at Level 1. Once audited, you can move into any of our residential towns: Daggerford, Stillwater, Bladebrook, or Warden. Travel between our residential towns does not require anything special like downtime or gold. You'll be able to move freely between them when you get started.
You will begin your adventures at Level 1. Once audited, you can move into any of our residential towns: Daggerford, Stillwater, Bladebrook, or Warden. Travel between our residential towns does not require anything special like downtime or gold. You'll be able to move freely between them when you get started.
1.3 Characters cannot start evil, but may become evil
Your character may become evil through actions and alignment shifts later, but the lowest alignment a character can start at creation is Chaotic Neutral. Please keep in mind, alignment will affect who you are able to group with, as the DMs will not put together a hostile party.
Your character may become evil through actions and alignment shifts later, but the lowest alignment a character can start at creation is Chaotic Neutral. Please keep in mind, alignment will affect who you are able to group with, as the DMs will not put together a hostile party.
1.4 Supported materials are below:
We mostly use content from the PHB, Xanathar's, Volo's Guide, and Sword Coast Adventurer's Guide, with a lot of extra added homebrew. We tend not to use anything from Tasha's, though you may see a few adjusted spells here and there. The website view before you are fully audited is only a limited list, as we have a large selection of quality and play-tested homebrew behind our login, but for now, everything you need is here:
View available races here.
View available backgrounds here.
View available classes here.
1.5 Multi-classing
Multiclassing is not readily available except under rare circumstances where the DM might incorporate an option during story. In those rare cases, all prerequisites must still be met. Don't be discouraged! Our PHB classes have already been buffed, and our homebrew is balanced within their own mechanics. This server really focuses on development and story. We feel "builds" have their place in homegames, but can be difficult to balance around in this environment.
Multiclassing is not readily available except under rare circumstances where the DM might incorporate an option during story. In those rare cases, all prerequisites must still be met. Don't be discouraged! Our PHB classes have already been buffed, and our homebrew is balanced within their own mechanics. This server really focuses on development and story. We feel "builds" have their place in homegames, but can be difficult to balance around in this environment.
1.6 Character Tracking
We utilize data in a few places. Your Chronica profile is a brief snapshot of your character, while your Roll20 sheet is the one you will use during session play. Take special note that these sheets do not automatically sync and it is up to you to ensure they match. Your full inventory and wealth will always be primarily tracked on Chronica, while your on-person inventory and wealth resides in Roll20.
Downtime is tracked automatically on Discord, and Chronica makes tracking your inventory and wealth easy, even if you run multiple characters! You will even get the chance to open your own shop or join a guild- all things you will see once you get started.
2.0 Character Outline on Chronica
The character creation process happens in two places; start with Chronica
2.1 Create your character on Chronica
Once you have been added to the Chronica campaign, click into the campaign from your User Dashboard. Go to Player Codex in the left navigation and click New Character in the upper right corner.
Once you have been added to the Chronica campaign, click into the campaign from your User Dashboard. Go to Player Codex in the left navigation and click New Character in the upper right corner.
2.2 Fill in the basics
- a. Fill out your Name and Gender. Leave the Character Status dropdown as
Alive. In the Gender box, please selectMale,Female, orOtherand type inNonbinary. Unknown is not an option. We all do our best to use preferred pronouns within context and Roleplay, but occasional mistakes are made and should not be harped on. - b. Your player username should already be selected in the Player Owner box. In the Player Character Label dropdown, select
Main Character. In Player Codex Folder dropdown, selectAuditing. - c. Main Card Stats Section. Leave Title and Faction blank, as you have neither yet. Disposition can be left blank, as it only applies to NPCs. Fill out your Race, Class, and Alignment. If you know what subclass you will be, please fill that in as well in the Class box.
- d. Custom Stats Section. Click to expand the Bio stats. Fill out your Birthday, Height, Weight, Eyes, Skin, Hair, and Homeland. This will need to match your Roll20 sheet that you create later. You can find the current in-game year in the
#dates-and-weatherchannel on Discord, to figure out your birth year based on your age. Your character MUST be of a legal adult age as per their race, with a minimum of 18. You can fill out the name Pronunciation if you wish. - e. Custom Stats Section (cont.) Click to expand the Character Info stats. Fill out your Deity. If you do not follow a deity, enter
Free Soul. Clerics, Paladins, Saints: You are required to have a Deity. Approved deities can be found here. Leave Faction Role blank for now. - f. Custom Stats Section (cont.) Expand the Background stats and fill in your selected character Background. Choose
two Personality Traits, oneIdeal, oneBond, and oneFlawfrom the table of options on your chosen Background. Please stick to the table options and do not make up your own. These are just a very basic guideline to get started. We do not expect characters to adhere to these adamantly. You can copy/paste directly from our website. - g. Custom Stats Section (cont.) You can leave the Marks of Battle blank unless your character has a notable scar or battle wound, though these generally occur more often during your session play. Feel free to fill out any of the Extras section, as this is extra information you can tell us about your character, but it is not required.
- h. In the Description box, enter your character's backstory. We do not need a novel, but more than a single short paragraph is preferred. Your background tells us how you came to be where you are now, and gives us some content to run off of, should we need it. Please keep in mind, you are level 1. You cannot have completed any grand deeds quite yet, that comes later! There should also be no interactions with deities/archfey/archfiends/high nobility/etc. These epic-level feats come from your time playing on the server, and are controlled by the DM.
- i. The Notes box may contain any extra information you wish to list. You may also add something in Personal Secrets if your character has something particular about them you want hidden from players. Only you and DMs can see Personal Secrets, but the DMs may share some lines here with the Loremasters so they can finish your audits.
- j. Upload a portrait image. We have some simple art standards to keep a semblance of fantasy environment and request no overly anime, "cartoony", or photographic images. Loremasters / Dungeon Masters have the final say on the image you choose. Please skim through the Player and NPC Codex to ensure you did not choose an image already being used. Your image will upload once you hit Create Character in the next step.
- k. Click the blue Create Character at the bottom and double check the profile to ensure everything is filled out.
2.3 Edit Character Abilities
From your character profile, click the green Edit Character Abilities at the top. Expand the various Proficiencies boxes to select anything your character is currently proficient in such as languages, tools, and instruments.
You can leave the Roleplay Feats, Academics, and Faerun Zodiac alone for now. You will be able to see those extras once you gain access to the full website, but we want to keep it simple to start.
2.4 Submit and head back to Discord
Head back over to Discord. Change your nickname on SCAR Discord server to: [CallName][1] HeroName. Your CallName is what you prefer to be called by on the server. This name really should not be changed, and sticks with you for your time here, so pick something you will be used to. The "1" is your level. This will be updated as you level up. Your HeroName is obviously the name of your character. Please avoid any emojis or special characters outside of normal language.
Example:
[Fred][1] Llaeven
2.5 Tag Loremaster to check your audit
Once complete, tag @Loremaster within your thread in the
Once complete, tag @Loremaster within your thread in the
#audit channel with @Loremaster, [characterName] is ready for a spot check on Chronica., and they will do a spot check, letting you know to continue on, or fix something, and create a thread for your audit to continue.
3.0 Character Sheet on Roll20
Once your Chronica outline is approved, you will be asked to move on to Roll20.
3.1 Join the Character Creation Server
Log into Roll20 and launch the Character Creation server. A link to the Character Creation server can be found in
Log into Roll20 and launch the Character Creation server. A link to the Character Creation server can be found in
#welcome-rules on Discord.
3.2 Locate your blank character sheet
You should see a few fresh character sheets on Roll20 waiting for you to edit labeled as "New Hero" or "Blank". Grab one of these and continue below. If you do not see a blank sheet, tag a @Loremaster in
You should see a few fresh character sheets on Roll20 waiting for you to edit labeled as "New Hero" or "Blank". Grab one of these and continue below. If you do not see a blank sheet, tag a @Loremaster in
#audit on Discord to load one for you.
3.3 Begin creating your character.
The sheet may look a bit daunting, but hang in there! A level 1 won't have too much to add, yet. Don't worry about any inventory until later.
The sheet may look a bit daunting, but hang in there! A level 1 won't have too much to add, yet. Don't worry about any inventory until later.
-
a. Core Tab: The Basics. Fill out your Name in the banner under our logo. Click the small gear in the top right of the larger banner, and fill in your Class, Subclass (if you know it yet). Fill in your Race, Subrace, Background, and Alignment. Your Level will be 1.

-
b. Options Tab: Background Modifiers.
Use the Point Buy Calculator to calculate your starting stats. If using the linked calculator, you will want to select "Custom Race" and fill in the chosen stats from your Background into the "Racial Bonus" boxes, since our starting stat bonuses come from Backgrounds instead of Race. Watch the total at the bottom to ensure it reads 27/27 when you are done.
With that done, head to the Options Tab on your Roll20 sheet and find the box titled "Attribute Options". Add the stat modifiers from your Background. In that same panel in the Permanent Stat Mod Notes box, list those same background bonuses. This is important because as you level and start gaining stats, the DMs need to be able to quickly audit over 30 different sheets.
An example of this is shown in the image. Yours should be formatted the same way. Try to keep stats sorted in the order they are listed and grouped by type.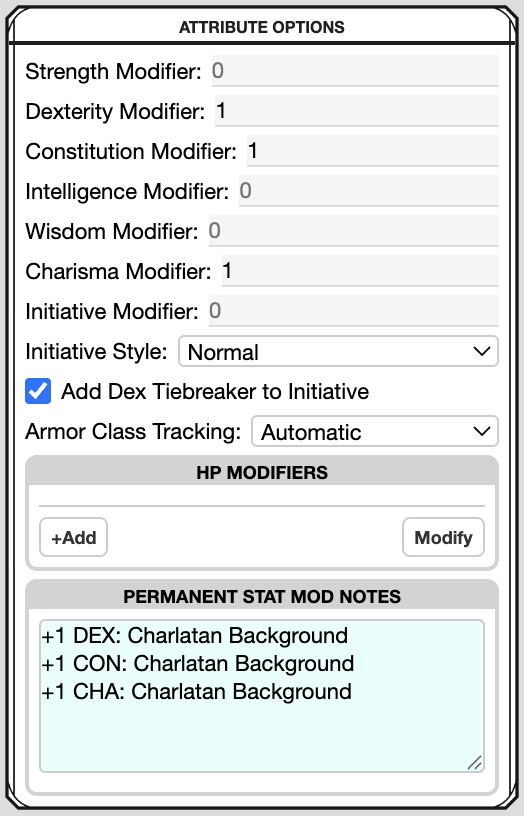
-
c. Core Tab: Main Stats. Back on the Core Tab, edit your stats on the far left by clicking the small numbers in the circles. Enter only the base stats you bought, not those you got from your background.
Your Saving Throws were selected automatically when you chose your class. Select your chosen Skills based on your Race, Class, and Background.
Enter your Speed at the top. Your Spellcasting Ability, Spell Save DC, etc should all automatically be filled for you.
Enter "1" for your Hit Dice. You can also calculate your Hit Points by taking your total Hit Dice (d6, d8, 10, d12) and adding your CON modifier to it. You get maximum hit points for level 1, and average for each level after. - d. Core Tab: Proficiencies. Make sure you are still on the Core Tab. Then, in the right menu of your Roll20, click the icon and search in the bar for all your proficiencies. Armor, Weapons, Languages, and Tools. Search for each one and click and drag them to your sheet. You can also add these manually in the bottom left.
-
e. Features Tab: Starting Stats & Proficiencies.
Over on the Features Tab, in the Starting Proficiencies panel, fill in the text required to give GMs a quick baseline of what you are starting with. This cannot change once you are out of audit.
Staying on this tab and in the "Class, Race, & Background" panel, enter in any other features from your Class, Race, and Background, such as Darkvision or special abilities. In the source box please clearly list where this comes from (such as your race name or class level).
You don't need to worry about the other two columns for now, unless you are a race that is starting with a feat. If that is the case, enter that feat in the third column titled "Feats & Other".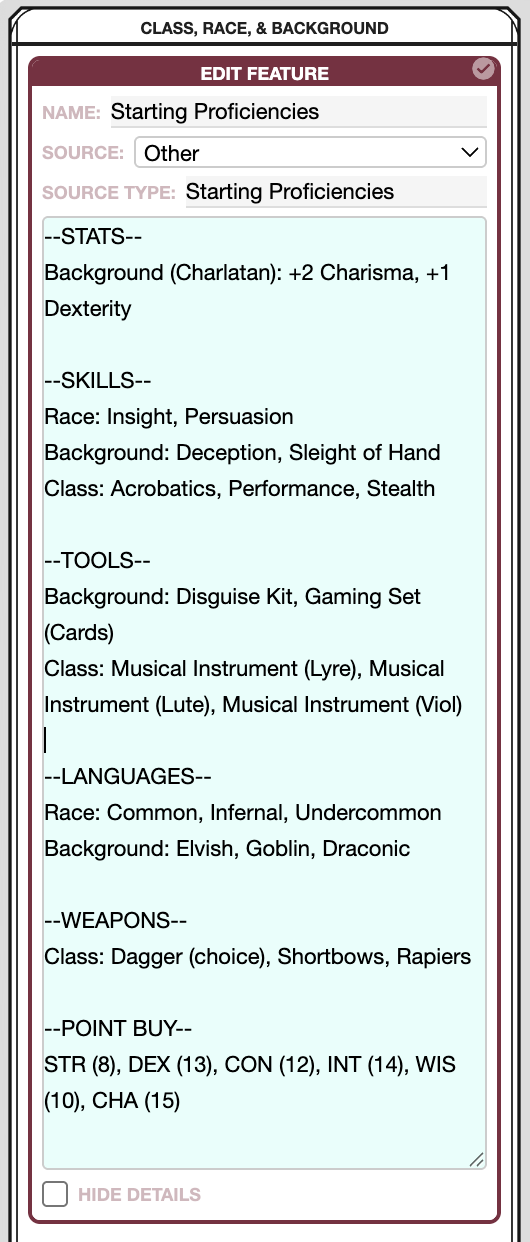
-
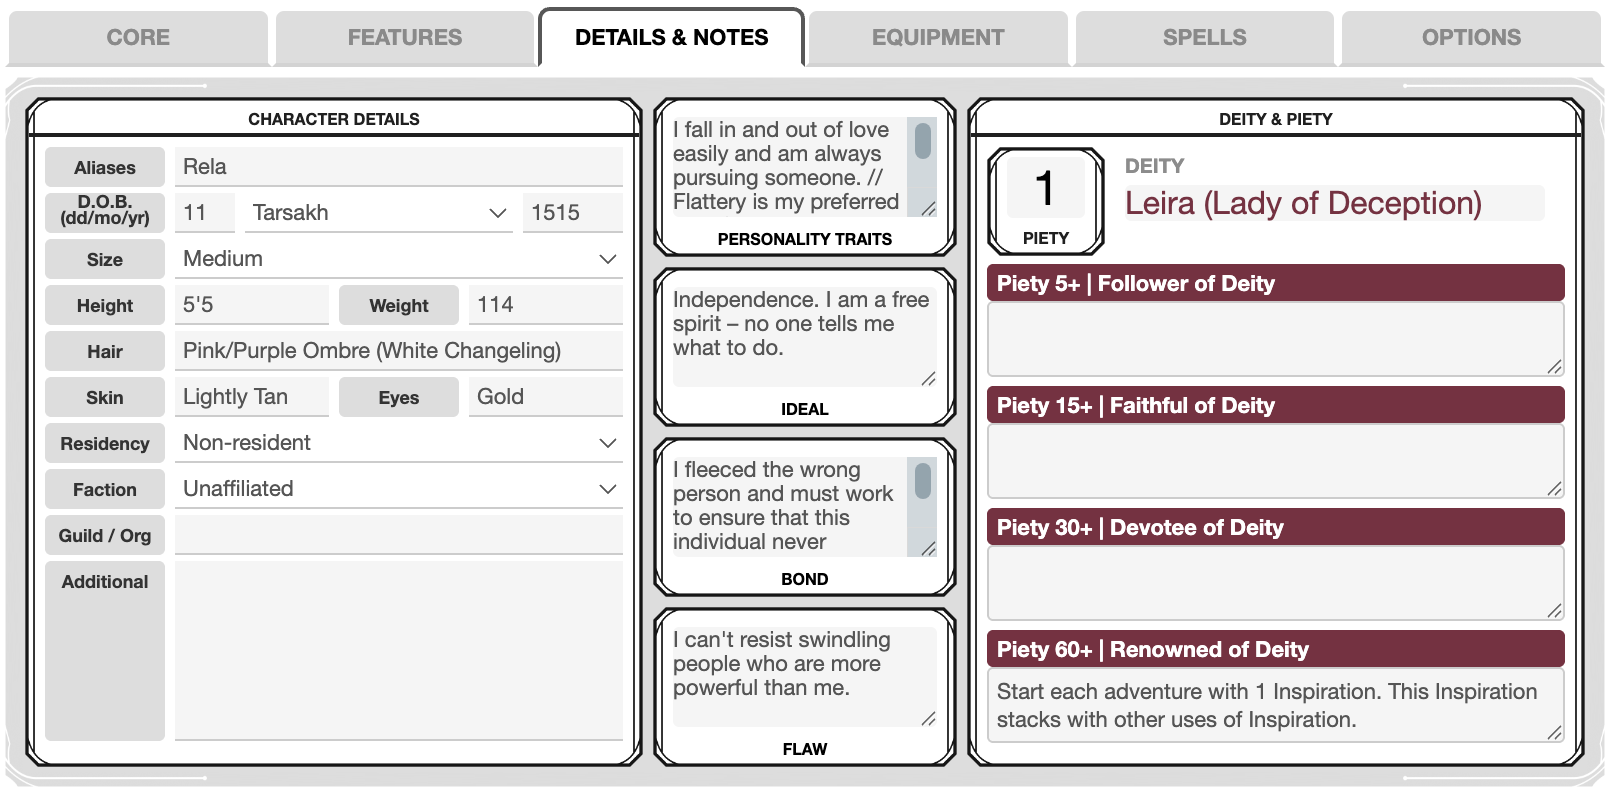
f. Details & Notes Tab: Character Details. On the Details & Notes Tab, fill out the Character Details box. Your Experience will be 0. You can select any day for your birthday, though for reference, the current date is always posted on Discord in the
#dates-and-weatherchannel. Your character must be an Adult.
Leave the following empty, as you will not have them yet: Residency, Faction, Guild/Org.
Fill out your 2x Personality Traits and your Ideal, Bond, and Flaw.
Enter your deity in the "Deity & Piety" box. You start with 1 piety. If you do not follow a deity, enter "Free Soul".
- g. Spells Tab: Character Spells. Make sure to peek at the Spells page to ensure selected spells are from our approved content. On the Spells Tab, search the compendium like you did with your proficiencies, and click and drag-and-drop your spells. You can also choose from our Homebrew spells! You'll just need to add them manually, as they won't be on the Roll20 compendium. No spells? Easy! You can skip this part!
- h. Upload Your Token. In the top bar of your sheet on Roll20, click the small gray Edit button. Upload a token image into both the Avatar and Default Token box. Your token should be a zoomed-in headshot. There are a number of token border generators online to use as you like.
3.4 Move on to Items and Starting Inventory
Don't bother with your Roll20 inventory yet! You will do your inventory on Chronica first. Continue below to set up your inventory before you request another audit.
Don't bother with your Roll20 inventory yet! You will do your inventory on Chronica first. Continue below to set up your inventory before you request another audit.
4.0 Items & Starting Inventory
Read below to outfit your new character.
4.1 Carrying Capacity
Carrying capacity is enforced, so you will have to pick and choose what you want to take with you for each adventure. (Variant Encumbrance rule is in effect, PHB 175.) Continue reading below to learn how to purchase your starting equipment. After you make it through audit, and get into town, you will have an inn room where you can drop some things off.
Carrying capacity is enforced, so you will have to pick and choose what you want to take with you for each adventure. (Variant Encumbrance rule is in effect, PHB 175.) Continue reading below to learn how to purchase your starting equipment. After you make it through audit, and get into town, you will have an inn room where you can drop some things off.
4.2 Inventory & Wealth Tracking
Chronica will contain ALL of your inventory and wealth. Whenever your Chronica wealth is updated, you must add a descriptive note for the change. This allows DMs to audit your wealth logs. Your Roll20 inventory (after initial audit) will contain only items and gold on your person that you are taking on that quest.
To reiterate, Chronica contains ALL wealth and items, organized into containers. It is your master inventory. Roll20 (after initial audit), will be filtered down to only items and gold on your person for quests.
4.3 Starting Gold & Equipment
- a. Start in Chronica, in your Player Dashboard. Click the green Edit Wealth button and add 150gp + gold from your selected character background. This is how much gold you get to go shopping with.
- b. Head to the Campaign Shops in the left navigation on Chronica, and use the search bar at the top to find and buy whatever gear you would like from the shops. You start with nothing, as we do not provide free starting kits. Instead, you get to go and shop for whatever you wish!
- NOTE: While you are gearing up, check out our Weapons and Armor page, as we have a more streamlined list of armor with homebrew adjusted AC and benefits, which may affect your purchasing decisions. The weapons list also has additional boons that apply to many weapons. If this looks too overwhelming for now, you can ignore the weapon properties, they are just optional to use if you want!
- c. At bare minimum, you will at least want: Bedroll, Camp Kit, Clothing, Backpack. No need to purchase Rations yet, you will pick these up before your first quest depending on the travel time for that quest.
- c. If you cannot find an item you are looking for, please feel free to ask in
#scar-chat. Our shops are player-run, which means some gear may be missing occasionally, but we usually get it stocked right away if asked! You can also skip that item to finish your audit, and purchase it once you get into town properly. - d. You are not permitted to create any items yourself, unless it is a completely mundane item specific to your background (i.e. "Letter from Mentor", "Trophy from a Kill").
- e. You get to keep any remaining gold you have leftover! Hooray!
4.4 Roll20 Inventory
- a. With Chronica done, head back to Roll20, and add all purchased items into your Roll20 inventory on the Equipment Tab. You can search for the items in the Roll20 sidebar under the icon, and click and drag most things over to your sheet. Anything that does not show up in search, simply add manually.
- b. Please note, you should see two containers in your equipment tab; Equipped and Backpack. Please move items into the correct containers by clicking the Modify button at the very bottom and clicking and dragging them. Items you are wearing should have the Equipped box checked and show an "E" to the left of the name. Everything else in your backpack should have only "Carried" checked, showing a "C". Note, make sure you still purchase a backpack. The container is ready for you, but you still need a backpack item itself.
- c. Add your leftover gold to Roll20. Make sure to convert any platinum to gold pieces. Also make sure all Roll20 inventory items have a weight assigned, even if you need to manually enter it. Nothing can have a weight of 0.
- d. Once your inventory is entered, make sure it matches your Chronica inventory exactly.
4.5 Input Item Slots
Check out our Item Slots page to get a bit familiar with our Slot system. On your Equipment Tab is an Inventory Slot section. This should be filled out only with actual items that take up a spot. You can leave entirely mundane things such as "belt" or "boots" off, as they are already included in your clothes (Ex: Traveler's Clothes). You will probably only have a few slots filled in right now.
Check out our Item Slots page to get a bit familiar with our Slot system. On your Equipment Tab is an Inventory Slot section. This should be filled out only with actual items that take up a spot. You can leave entirely mundane things such as "belt" or "boots" off, as they are already included in your clothes (Ex: Traveler's Clothes). You will probably only have a few slots filled in right now.
4.6 Tag Loremaster to Check your Audit
Once complete, tag @Loremaster in your thread on the
Once complete, tag @Loremaster in your thread on the
#audit channel with @Loremaster, [characterName] is ready for a check on Roll20 and inventory. You will receive instructions on when to proceed.
5.0 Finalizing Audit
Welcome to the Sword Coast, hero.
5.1 Welcome!
With the audit finished, a Dungeon Master will add the appropriate tags to your Discord, which will open up more channels. You will also receive a few extra instructions, outlined below.
With the audit finished, a Dungeon Master will add the appropriate tags to your Discord, which will open up more channels. You will also receive a few extra instructions, outlined below.
5.2 Post your Roll20 username
Over in Discord, please post your Roll20 username in the
Over in Discord, please post your Roll20 username in the
#roll20-usernames channel.
5.3 Post your hero
Post your character bio in
Post your character bio in
#heroes on Discord, following the template pinned in that channel.
5.4 All done!
With everything done, congratulations! A Dungeon Master will move your character to the Head Table server before your first quest. No more changes should be made on the Character Creation server. A link to the Head Table server can be found in
With everything done, congratulations! A Dungeon Master will move your character to the Head Table server before your first quest. No more changes should be made on the Character Creation server. A link to the Head Table server can be found in
#scar-information. Questions? Feel free to peruse the website more or hop into Discord to ask.